

Chassis, Suspension, and Brakes
Restoring the Dust Shields
The dust shields found on disc brake cars can also bow be restored to as new condition with a little effort. Contrary to popular belief, these pieces were stamped from a sheet of galvanized steel and were not zinc plated. Many people replate them in zinc which is not technically correct but it does resemble the original appearance and for a nominal cost.
Since re-galvanizing these parts would not only be expensive but it is also a different process today than it was in the 70’s and therefore has a different look. One way to restore these with a similar appearance to galvanizing is to ‘mottle’ them with various colors of silver paint thereby giving them that galvanized look.

Original backing plates were stamped from a sheet of galvanized
steel. With a little effort you can replicate this process by
tamping various shades of silver paint onto the plants using a spice
of crumpled up cellophane. When dry, add your decals for a very
nicely restored piece. Depending on the assembly plant, AS (Atlanta
and Van Nuys) and DK (Arlington, Baltimore and Kansas City) decals
were used on early backing plates. If you have your build sheet, the
correct decal will be shown in box #12. If you do not, you can
purchase the
1970 SS396/SS454 Build Sheet Decode Program that covers Atlanta,
Baltimore, Kansas City, and Van Nuys.
This is also inexpensive to replicate but does take a little practice to get them to look correct and fairly smooth. Using a crumpled up piece of cellophane, dip it in some silver that you sprayed onto a newspaper and dabble it onto the backing plate in a tamping manner. Does this several times over the entire piece and with multiple colors of silver and you will achieve a very close look to the real thing. Finish it off with the correct two digit part code which can be found on your build sheet if you have one and you are done.
Caliper Bracket Replating
Since it takes some time in the shipping and plating process, it is suggested that you send off your caliper brackets to be plated to allow time to get them back so you can reassemble them. These can be plated in gold cadmium, which resembles the originals. It is suggested to chemically strip any paint that may be on them as opposed to bead blasting. Blasting will etch them and give the gold a flatter look instead of the desired rainbow appearance.
Calipers were pla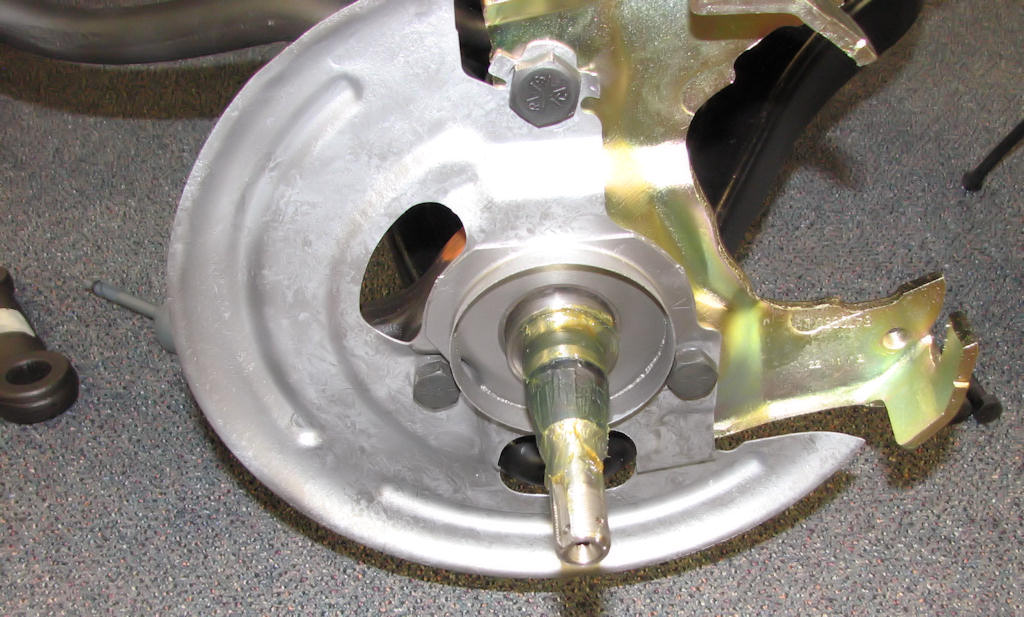 ted in gold cadmium which has a slight rainbow
color effect. To achieve this same color, the metal must be cleaned
and smooth in finish. Any roughness from blasting them will
translate into the plating and give a flatter appearance that what
is desired.
ted in gold cadmium which has a slight rainbow
color effect. To achieve this same color, the metal must be cleaned
and smooth in finish. Any roughness from blasting them will
translate into the plating and give a flatter appearance that what
is desired.
An exception is plastic or walnut blasting, as that will not etch the metal. However, soft media blasting will not remove the rust. If badly rusted, you may just want to find a donor set of brackets that are much cleaner to start with. If you are not bothered by the flat gold appearance of the brackets that have been blasted, thoroughly clean and plate them.
Caliper Rebuilding
When it comes to your front calipers, you will want to either rebuild your originals or simply replace them with auto store rebuilt units. It is actually cheaper to replace your originals than it is to rebuild them. However, it you are into original numbers, you will likely want to rebuild your own.
You must first determine if your original calipers badly pitted an unsightly or are thy just showing average wear? Are the damaged or bent? Are they the correct part-numbered unit for your car? Have they been replaced with non-original units in the past? If you decide to rebuild your own, proceed wit the next part.
Using a large C-clamp or piston-compression tool that you used when you removed the calipers. Slowly compress the brake pads and/or piston back into its bore. Once again, keep in mind the fluid you may displace will have to go somewhere, so plan accordingly and have rags and a pan ready to catch this fluid as it come out of the rear of the caliper.
Once the pistons are compressed, remove the pads if you have not done so already. Place a 1” thick board or a hammer handle between the piston and the outer housing of the caliper. While keeping your fingers clear of the piston area, apply a small amount of pressurized air into the brake line hose attachment hole and make sure the bleeder screw is closed. Tap your air gun with a few short bursts of air into the hole. It is best if your air gun has a rubber coned tip that will allow you to tightly seal it to the hose inlet hole. The piston will come up out of its bore where you will now be able to remove it by hand. Once the piston is out of the way, remove the piston dust boot and rubber piston ring and discard. These will come in a new rebuild kit and can be replaced at that time. Carefully check the piston for pitting. If it has any amount of pitting you must replace the piston which is readily available from your favorite auto parts store.
Remove the four “O” rings from the mounting tabs on the caliper and discard. These too are included in the rebuild kit. Once the caliper if completely disassembled, thoroughly clean and blow dry it off. It is best if you media blast the unit after cleaning to remove the scale that has accumulated over the years. If that is not available simply use a wire brush or wheel to remove the scale. If you do media blast yours, make sure to remove any remaining media.
After cleaning, paint your calipers in either cast iron colored paint or in a semi gloss black and start the reassembly using the kits directions. Carefully use either Dot 3 or Dot 5 fluid as a lubricant when reassembling any of the rubber parts being careful to not get brake fluid on the painted surface. Either Dot 3 or Dot 5 can be used in your car’s braking system. Dot 5 is a silicone fluid and will not harm the paint. Reassemble the piston seal, piston and piston dust boot onto the caliper. Reinstall the new “O” rings in the mounting pads of the caliper and apply anti-seize to the mounting bolts. Set aside the completed units until it comes time to mount them back on the front calipers.
| Chapter 4 - Chassis, Suspension, and Brakes © Chevelle Restoration |


 |



