

Chassis, Suspension, and Brakes
Bodywork and Primer
You are now ready for bodywork and primer for your frame and components. As stated many times previously, before you do any bodywork and priming you must prep the metal on the frame and all of the component parts just prior to doing bodywork. Prep-Sol or other acid wash will be required to clean the frame thoroughly enough to accept the paint process. From this point on avoid all contact with those parts with bare hands, dirty rags or air borne contaminants as this will again contaminate the bare steel and cause issues with the paint process. You should use no less caution and preparation on a frame and its components as you would on the body so do not skimp here either.
With regards to bodywork, priming and painting and as mentioned earlier, we will not get too technical here as painting techniques are covered in length in the Body and Paint Work chapter and this area should be done much the same as the car’s body. If you are doing a concours restoration you will either have a professional spray out these parts for you or if you yourself are educated enough than you already know what you are doing here. With the home restorer in mind I will cover the basics.
Another option is to powder coat your frame and parts and this is only suggested if doing this on a driver car or weekend show car. Powder coating is a type of coating that is applied as a dry powder. You can find much more on this in the Body and Paint chapter. The main difference between spray out automotive paints and powder coating is that the powder coating does not require a solvent to keep the binder and filler parts in a liquid suspension form. The coating is typically applied electrostatically by a gun and is then cured under high heat, around 400 degrees Fahrenheit, to allow it to flow and form a painted skin over the metal. It is used to create a hard finish that is tougher than conventional paint and at a much cheaper price. Powder coating comes in a wide variety of colors for those that are looking to color their parts other than what was the norm. You can also chose the gloss level in most cases.
Keep in mind when powder coating that all your parts will need to have been completely cleaned of all paint, rust and oils. Also and unlike when painting, you cannot powder coat any parts that have items like rubber, plastic or anything else that will not withstand the high curing temperatures used to back out the powder coating. Powder coating is recommended if you are not concerned with flaws in the frame such as pitting. Minor pitting can be filled with a product like J-B Weld but check with your powder coater and read the complete application and usage recommendations of the filler product before using to insure that the high curing temperatures are compatible with the filler. Body filler cannot be used when powder coating. Powder coating is not recommended on a concours restoration only because this was not originally used by the factory so it would be considered incorrect on those restorations. However, if you are not intending to have your car judged then by all means use powder coating as this is a much less expensive way to finish your frame.
Protecting the Frame
If you are choosing the more conventional painting method, the first step after cleaning these parts is to either cover the bare steel with a rust inhibitor like POR 15 which is widely available over the internet and in many parts stores or sand blast followed by the appropriate body work, priming and painting. For POR 15 usage, follow the instructions on the can and either brush or spray the frame and components to seal them from future rust that was not completely removed. You will still need to topcoat over the entire area as it is not a final sealer and this method should only be used on a driver quality frame.
For a concours restored frame all the imperfections must be filled and sanded smooth. If you are very detail oriented you do not want to cover or destroy the factory stretch marks, welds or stamping wrinkles that were made when the frame rails and pieces were initially stamped. Filling of all the rust pits is imperative if you want a show quality job but is very time consuming so be forewarned. There are several types and brands of body filler on the market. Bondo is just one and is not only a brand name but also the generic name when talking body filler. It can be obtained from a variety of automotive parts stores, retail stores and on line.
Fixing Imperfections
Using an applicator from your auto body and paint supplier, fill all imperfections with the bondo, let dry thoroughly and sand smooth using progressively finer grits of sandpaper. There are also several other types of sanding products available such as Scotch Brite pads, sanding discs and screens. The use of pneumatic sanders will also greatly improve your sanding time if these are available to you. Talk with your paint and body supplier and purchase what is best for your needs. You may have to apply more than one coat depending on the depth of the damage, pits or imperfections. Again refer to the manufacturer’s application guidelines. In some cases you may want to finish off the final filler application with a glazing and spot putty. This is much thinner, goes on easier and sands off with little effort. Try to get most of your work done with the bondo and only use the spot putty for finite details that were missed. Spot putty shrinks considerably so you do not want to lay it on very thick. This is a very time consuming process but taking your time here to make sure you do it right will pay in the end giving you a very smooth finish on your frame and parts and in return excellent visual finish results.
Primer on Parts and Pieces
Once all your sanding has been completed and has cured thoroughly per the manufacturer’s specifications apply a coat of primer over all your pieces thoroughly. Again, talk with your body and paint supplier and purchase the product that best suits your particular needs. After the primer has cured you will want to wet sand it smooth just prior to your paint application. You may have to do more than one coat of primer and wet sand process before you are ready to apply the paint. Since most types of painting will require expensive guns you may want to leave this step up to your local painter though you need to check with them first as some painters will not apply paint over someone else’s work while still offering a warranty.
If you will be applying the chassis paint or having your painter apply it, use of a semi gloss black is recommended as this will closely match what was originally applied. If you are doing a driver or Restomod then you may want to use a glossier black or even another color to suit your needs or to compliment the body color.
Gloss Differences on Upper and Lower Control Arms
The front upper and lower control arms are painted a little more gloss than what you painted the frame with. The cross shafts on the upper control arms should be a natural cast iron. Before painting the upper and lower control arms, mask off the bushings and cross shaft as these should not be primed or painted.
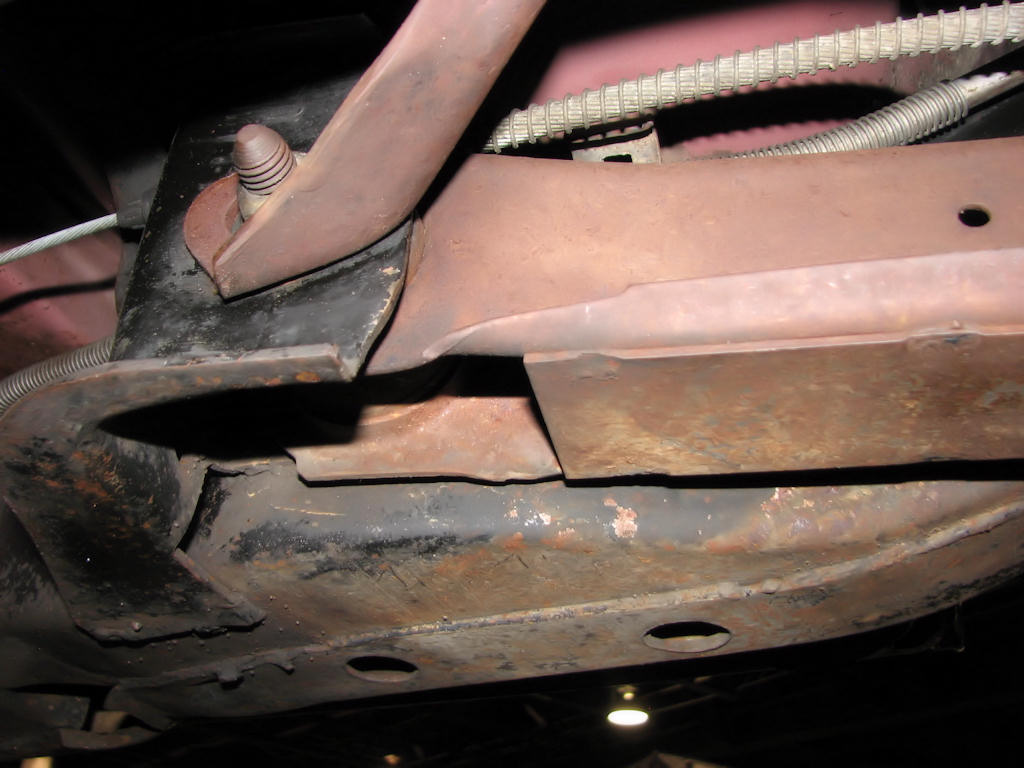
On the particular survivor Arlington LS6, you can clearly see
the semigloss black paint as well as the natural-steel lower
trailing
arm and frame stiffener arm. Attaching bolts are black phosphate
while the lock nuts are dull zinc or galvanized. Semigloss black is
also correct for the arms.
On the rear trailing arms, it will depend on what you decide as far as natural or painted. Many Chevelles have been documented with several combinations such as painted differentials but natural trailing arms and vice versa or everything painted or all natural steel. Here is where you will need to decide how you want to do yours. The one exception is, if painting them black the upper trailing arms were typically a flat black while the lowers were a semi gloss. All four have been seen natural as well. Just like you did for the front control arms, mask off the bushing before you prime and paint. The same goes for the two rear stiffener arms that are mounted on some cars. These were mounted from the front of the lower trailing arms and at the top of the rear cross member. What is normally seen is if the rear differential is natural than all four trailing arms and rear stiffener arms would also be natural. If the rear differential is painted then the arms usually are as well.
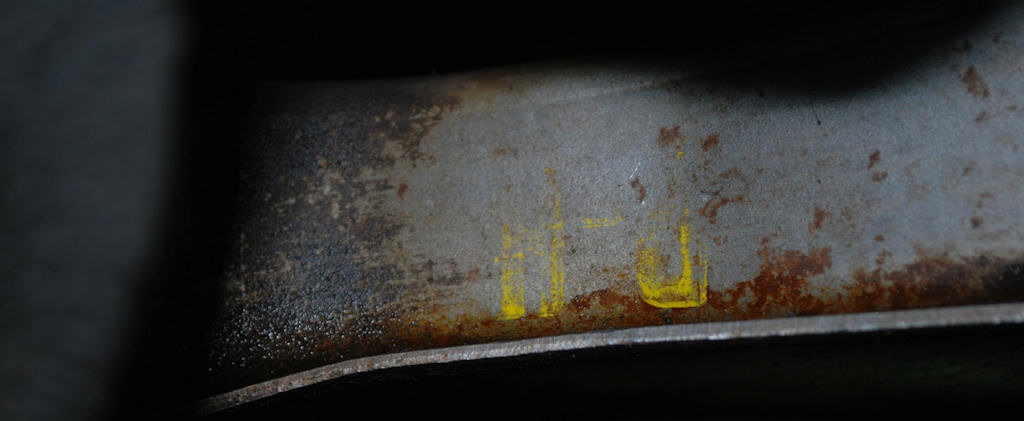
This is an example of an upper trailing arm that was left
natural steel by the supplier to GM. On this particular car, all of
the trailing arms, stiffener arms, and rear differential were left
natural. Also notice the two-digit code ink stamped onto the arm.
Photo: Brian Henderson
Front and Rear Sway Bar
Front and rear sway bars have been found in both a natural cast iron finish and in a semi-gloss black painted. Either way would be considered correct. If you intend to paint yours natural use a cast iron colored paint.
Transmission Crossmember
Transmission cross members have also been found in both natural steel as well as semi-gloss black. If going for the natural look use a stainless steel colored paint.
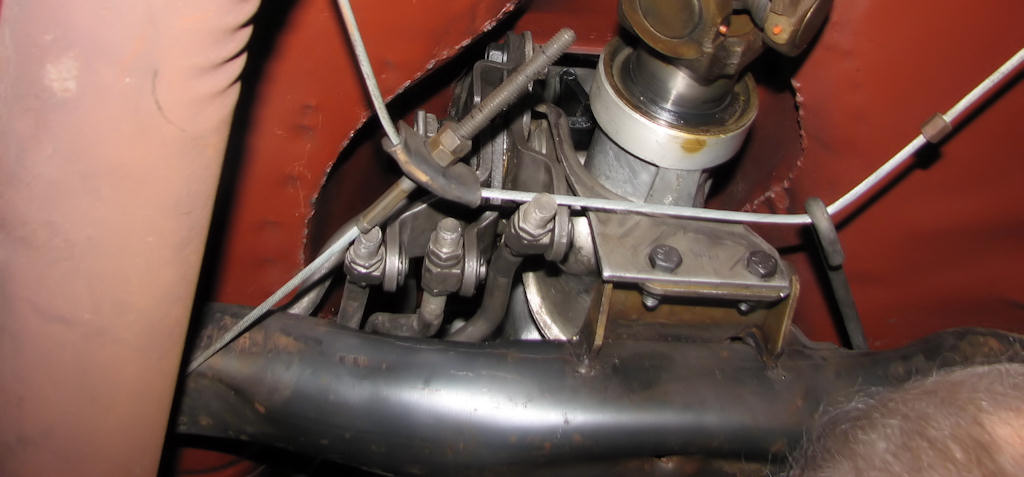
Seldom seen is the natural steel transmission crossmember.
Typically they are painted semigloss black to match the frame. Also
note that on unpainted crossmember the welding process has left a
bluing color to the metal in the area around the welds from the
heat.
Natural Steel Coil Springs
Coil springs front and rear were left natural steel and should be painted as such unless you again go for the black or cast iron look. Powder coating is another good way to paint these though care must be taken to not get the paint too thick as it may then crack when the spring flexes. After painting you can attach the appropriate spring code decals.

Lots of details here in this photo of a low-mileage survivor
1970 Chevelle: the semigloss black frame, natural-metal
differential, nature-steel upper trailing arm, natural-steel coil
spring, and gray shocks.
| Chapter 4 - Chassis, Suspension, and Brakes © Chevelle Restoration |


 |



