

Body & Paint
Document Your Project
Before you get started on the metal fabricating and body repair and like any other part of the restoration it is important to photograph and document many areas of the project; both before you get started and while you are disassembling the car. Whether or not you are using the original sheet metal or if you plan on replacing some of it, it is important to photograph how everything fit prior to disassembly. Hood to fender gaps, fender to door gaps and the gap where the doors and trunk lid meet the quarter panels are very important in achieving a good looking and correct restoration. These photos will be a good reference to fall back on when realigning the original panels or replacing them with new. If you are restoring the Chevelle for a customer it will also document what you started with and what had to be done to correct it and why. Photo document any factory defects such as paint runs, sloppy welds, color application, etc. especially if you intend to restore the car exactly as it was built.
Clean Up, Pressure Wash and Degrease
Before you move forward it is best to clean the body thoroughly so you can document what you find. If you are looking to find some of the original inspection marking or even the colors of the primers and undercoats, cleaning and degreasing your floors may help you uncover it if it was there to begin with. Years of road grime, dirt and debris seem to build up everywhere. If you have your body on a rotisserie or have access to one, pressure washing the floors is a good way to get it cleaned up. This will allow you to turn the body and pressure wash the floors inside and out. It will also dry much easier if you are able to rotate the body to get rid of the water.
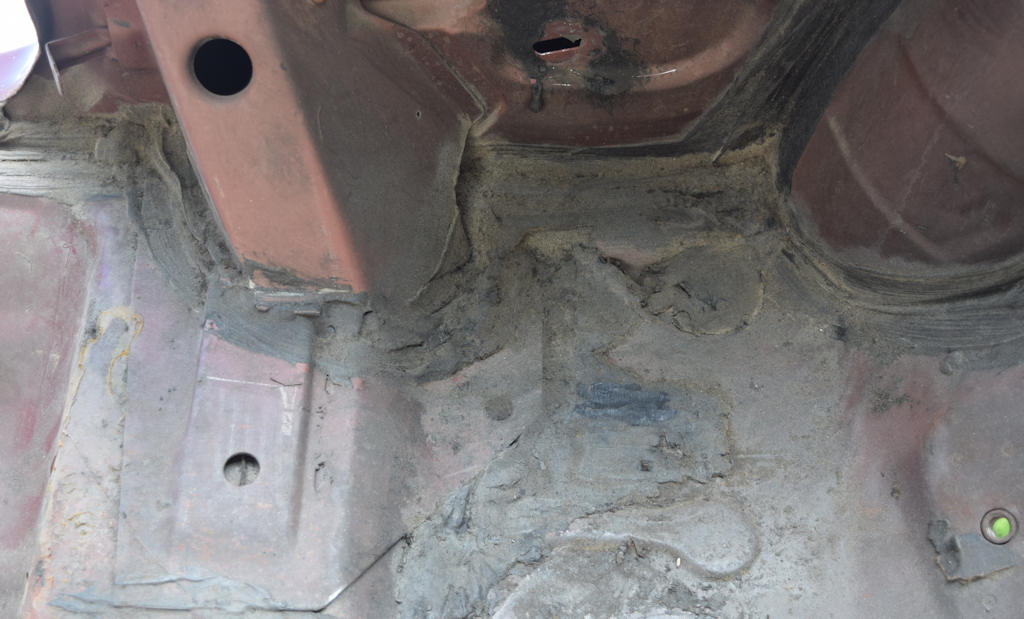
Once you have disassembled the car it’s a good idea to clean everything
inside and out. This is a good example of a pressure washed floor. This
will help you locate inspection marking, primer colors, overspray patterns
etc.
Another way is to take wax and grease remover, spray a two foot by two foot area and wipe clean with a dry rag. This way will take a little more time but will produce the same results. Be sure to photograph all of the color overspray patters and inspection marking for placement, size and color that you find. If you are planning on doing an assembly line correct restoration, these photos will once again come in handy when you get to that point.
Seam Sealer Application
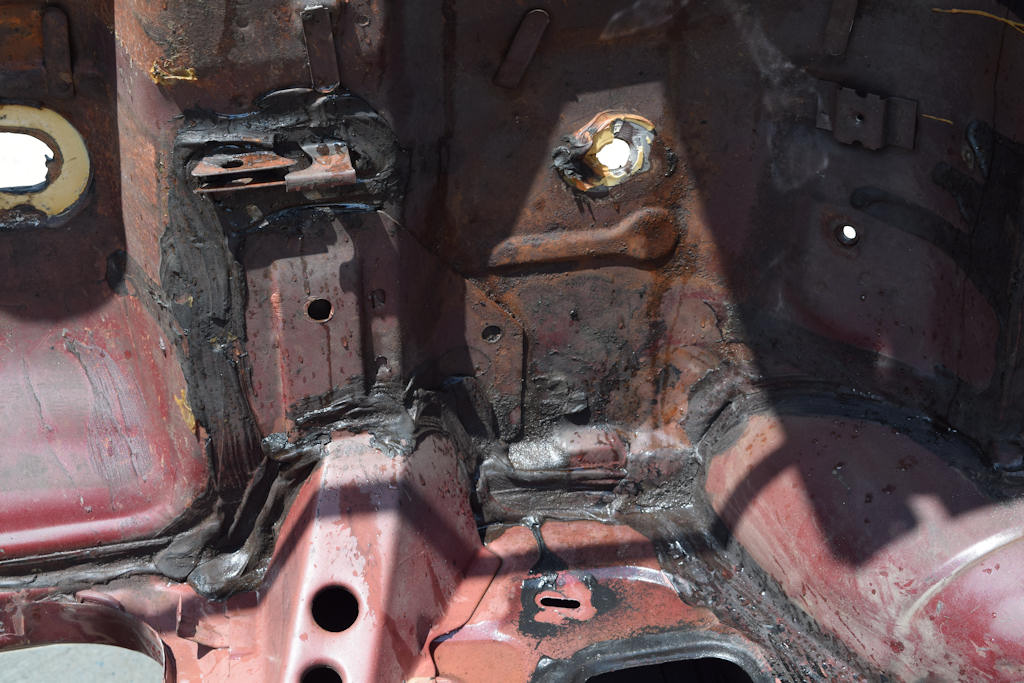
Take note of seam application and color if you are attempting to
reproduce a factory original restoration. Note that there may be different
colors of sealer that was factory applied. The seam sealer used in the
floors was black in color and had a greasy look to it. Lord Fusor 805HD
is a great sealer to duplicate that rich black look.
Take photos of all the areas that have seam sealer. This will help you document what areas it was applied to, the amount that was applied and the color that was used. You may also want to make note of when it was applied, i.e. over the primer, over bare steel, does it have body color overspray on the sealer, etc. You need to remember that seam sealer was applied by a human assembly line worker not a machine so one Chevelle may vary from one to the next and may have been applied differently. Whether it was applied lighter, heavier or just not applied at all may vary from car to car and manufacturing plant. Also how neat or sloppy it is will also vary from car to car. Here is where that Monday or Friday build comment comes into play.
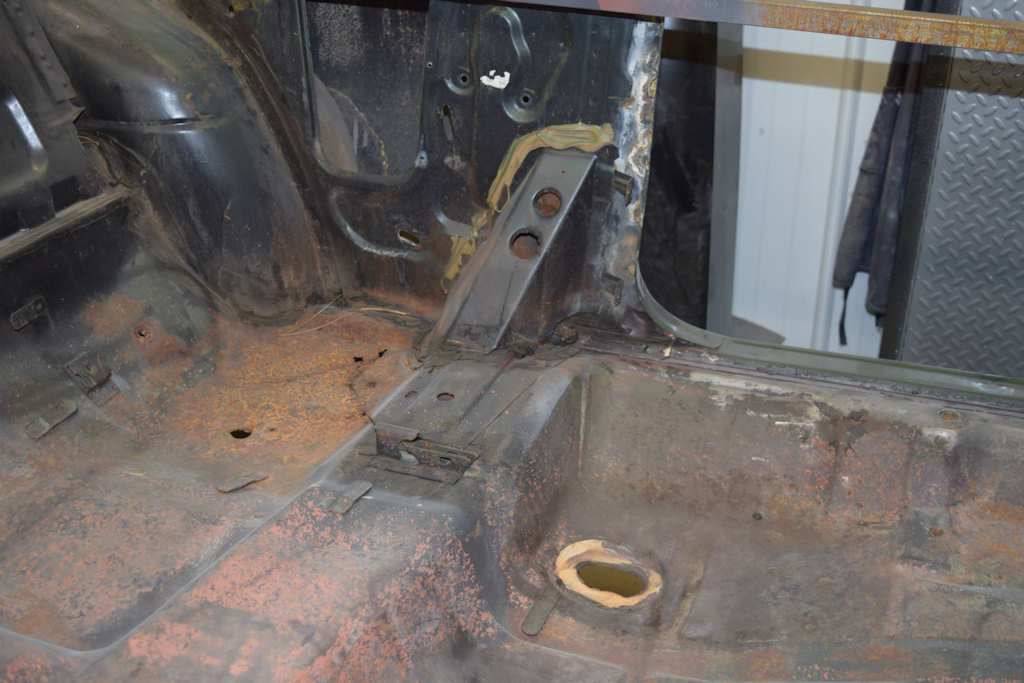
Take note of seam application and color if you are attempting to
reproduce a factory original restoration. Note that there may be
different colors of sealer that were factory applied.
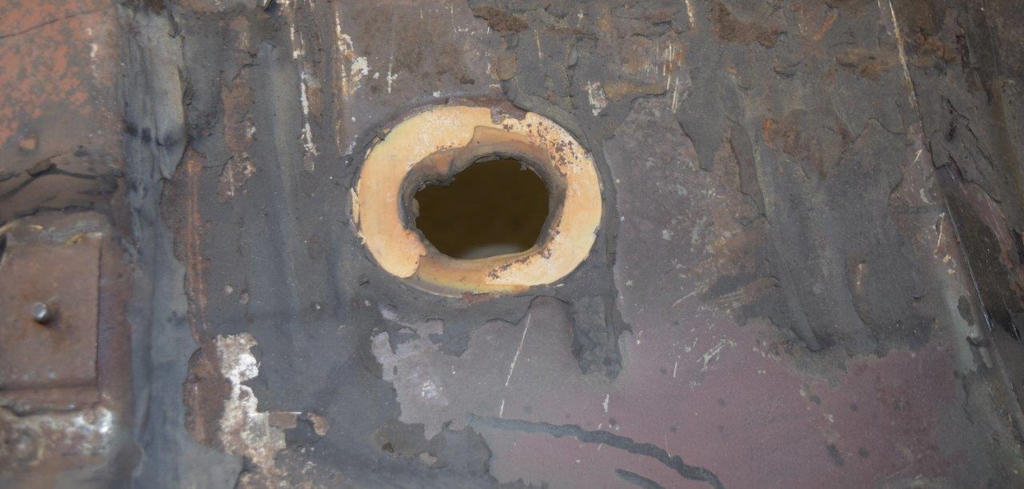
The floor plugs were held in with caulking once the car had been
primed. These are most often white in color though they may appear
to be off white due to age. Green has also been found depending on
the plant and assembly date.
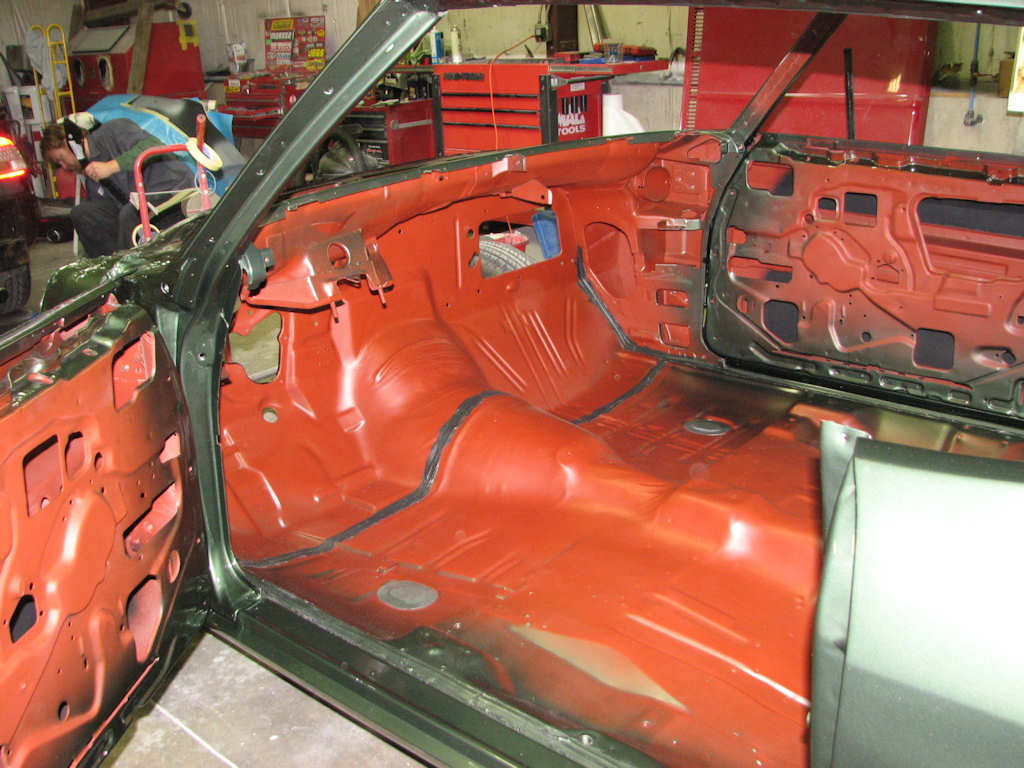
The Atlanta plant used a greenish grey primer followed by a thin
black out paint applied to the dash area. Also note the application
of the caulking on all the seams which would also include many areas
where brackets were welding to the floor such as bucket seat mounts.
Both are great products with DX440 being a little stronger than DX330. You will have to spray it on and wipe it dry several times to get it cleaned up. You may also notice the oily residue creeping back from underneath the pinch weld of the two panels it was applied to. Be sure to get it all cleaned up before sanding or media blasting.
Undercoating may be a little more challenging to remove depending on the type that was used. Some if it may flake off while pressure washing or even by using the putty knife to scrape it. If that process is taking too long or if it’s too difficult to remove you can try a little heat. Again, a heat gun is the safest method or if you have oxyacetylene torch or even a hand held propane torch you can wave the flame over the panel being careful as to not apply too much heat as it may catch fire and burn. Keeping a distance of eight or so inches away from the panel, slightly warm up the undercoating and loosen it. This will allow you to scrape it off much easier and not risk warping the panel.
Original Primer & Paint Application
Document what color the original primer was as this also varied from plant to plant and from year to year. Make note of any black out paint that covered the primer on the floor and firewall if the plant your car was built at did that. Look for any paint drips on the belly pan and firewall. Investigate to see if your firewall was painted prior to the body color being painted or after based on overspray patterns as this also varies from plant to plant. How far did the body color overspray cover the primer or blacked out areas? Is the paint coverage in the door, hood and deck lid jamb areas thinner than the main body? How was any sound deadener applied and to what areas? Look for any areas of the body that may still retain original factory applied paint.
Areas such as under the deck lid surface, on the cowl ends, under the door or deck lid weather-stripping or under the upper roof rail weather-stripping are good places as many times these areas were unmolested during a repaint. This will give you a very close example of what color paint was originally applied to the car. Using paint chips you should then be able to get very close to the original color. In the case of special order painted cars (- - on the trim tag), finding these original painted areas will not only give you a color example but may be used as proof it its origins. Photographing all of these areas will help immensely in the paint restoration and documentation process. If you chose to restore your car exactly how it was built all of this will give you photographic proof of where and how things were done.
Removing Seam Sealers and Undercoating
The seam sealer that was used in the floors was black in color and will scrape out with a putty knife rather easy. On occasion using a heat source such as a heat gun will aid in the removal. The problem is it will leave behind an oily residue that will need to be cleaned up. PPG’s DX330 or DX440 is a good wax and grease remover to use for this. Both are great products with DX440 being a little stronger than DX330. You will have to spray it on and wipe it dry several times to get it cleaned up. You may also notice the oily residue creeping back from underneath the pinch weld of the two panels it was applied to. Be sure to get it all cleaned up before sanding or media blasting.
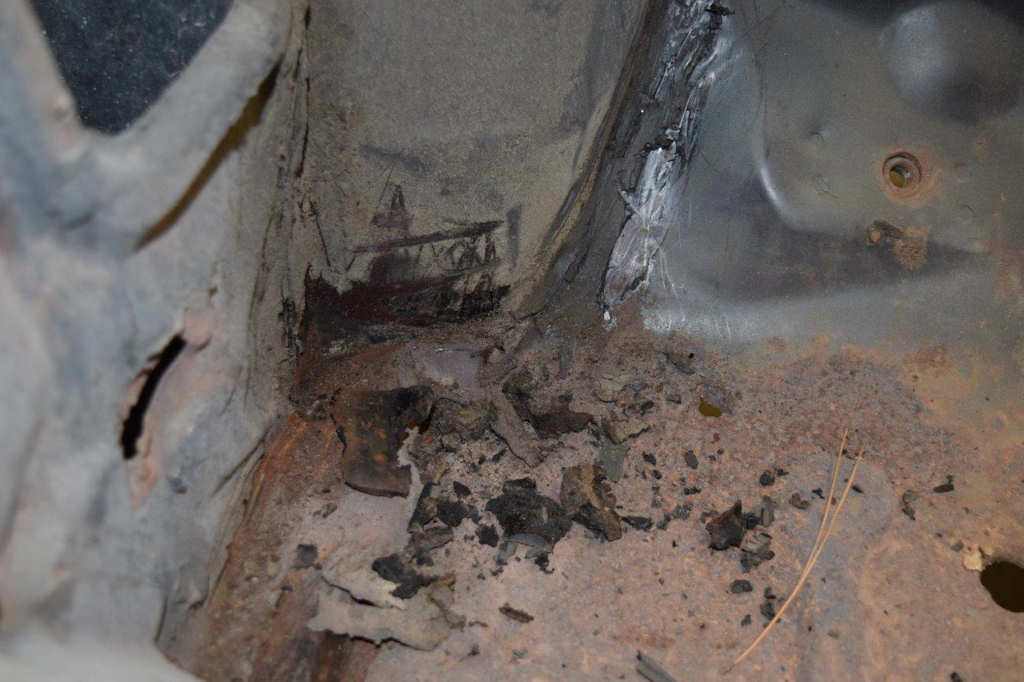
The seam sealer used in the floor area was usually black in color
and had a greasy look and feel to it. Lord Fusor 805HD is a great
sealer that can be used to duplicate the rich black factory look.
These sealers were brushed on so you will also find brush marks.
Undercoating may be a little more challenging to remove depending on the type that was used. Some if it may flake off while pressure washing or even by using the putty knife to scrape it. If that process is taking too long or if it’s too difficult to remove you can try a little heat. Again, a heat gun is the safest method or if you have oxyacetylene torch or even a hand held propane torch you can waive the flame over the panel being careful as to not apply too much heat as it may catch fire and burn. Keeping a distance of eight or so inches away from the panel, slightly warm up the undercoating and loosen it. This will allow you to scrape it off much easier and not risk warping the panel.
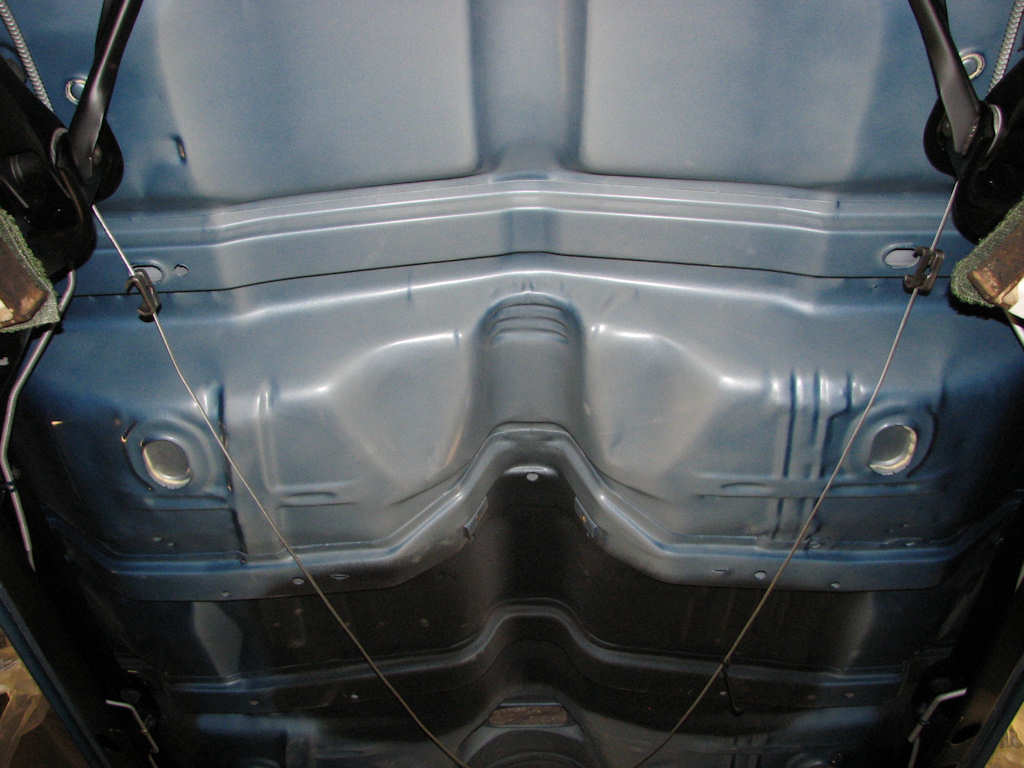
After cleaning make special note and photo document how the factory
sound deadener was applied so that it can be restored the same way.
This application varied from plant to plant and the assembly line
working doing the actual spraying.
Common Rust Areas
Depending on where and how your Chevelle was used or stored will determine the amount of metal fabrication or rust repair your project will need. Repairing these areas properly is vital to insuring the longevity of your restoration and the value of it. Some of the common areas of rust that you may encounter are; cowl side panels, toe boards, floor pans, windshield and roof pillars and outer rear wheel houses besides the most common areas such as fender bottoms, door corners and quarter panel wheel openings.
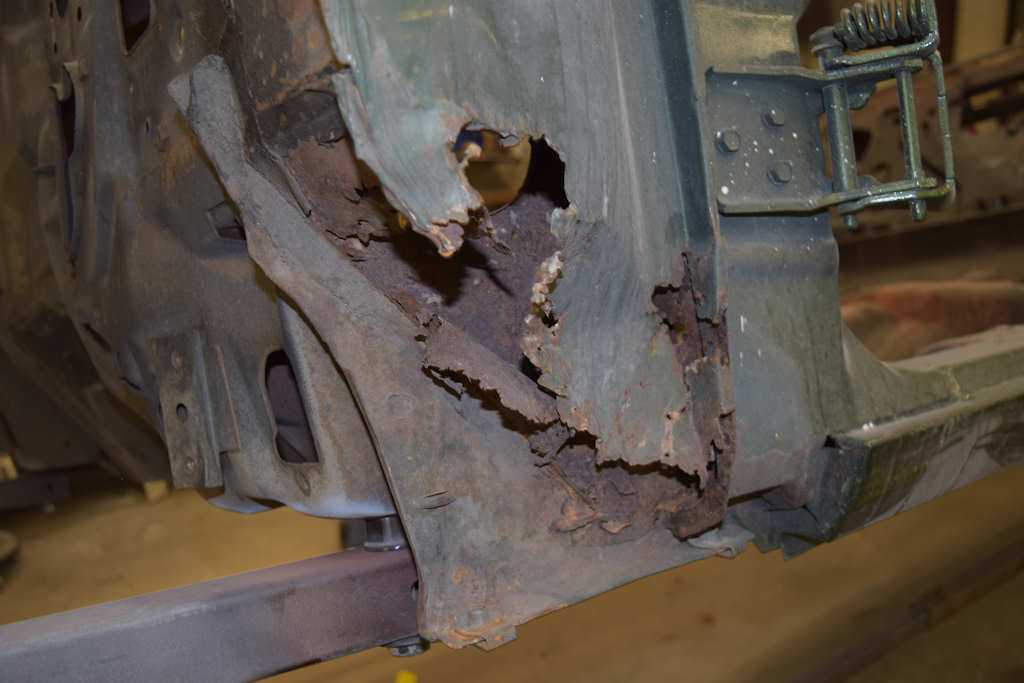
This type of damage is very common on these cars and is often times
missed when casually looking over the car. It can also be very
costly to repair. Expect and plan for the worst when budgeting for
your restoration.
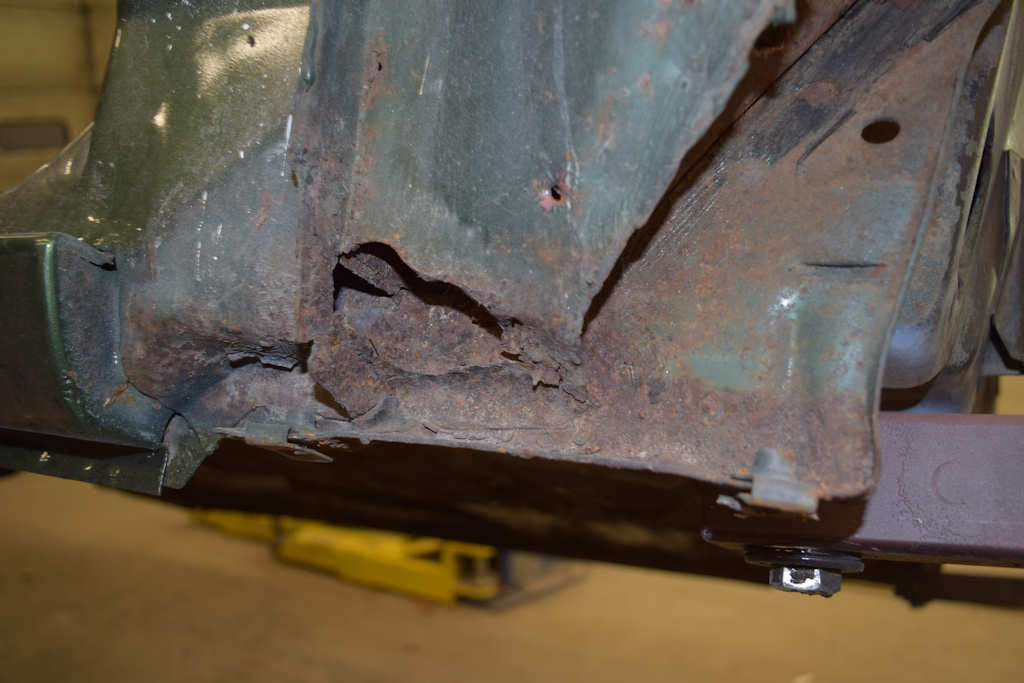
A common area for the Chevelle to rust out is the lower side of the
cowl. This is made up of two panels, the inner and the outer cowl
side panel. Depending on how bad yours is, if at all, you may
consider sectioning in the lower half rather than replacing the
complete cowl side panel
Checking For Original Body Color Match
No matter what paint manufacture you or your body shop may be using, you will want to verify the correct color match before you start stripping the paint off of your car. Just because your paint jobber has a formula available to mix the color does not mean it will be a correct match. There are different types of base coats and single stage paint products that could give you a different shade of the color. It is very important that you do a spray out of the color with the paint line you intend on using and compare it to an area on your car that is still in original paint.
Remember that more often than not these cars have been repainted over the years and just because it appears to look like the correct color does not necessarily mean that it is. A lot of times once you have removed the fenders from the car the side of the cowl will give you a good look at the original color. Because that area has not been exposed to the sun you should be able to polish it up and have a good sample of the original color to match your spray out to. Underneath your door panels and seals is another good place you could possibly find original paint to compare your color spray out card to. This is a step that is easily forgotten and will be too late once the body is stripped.
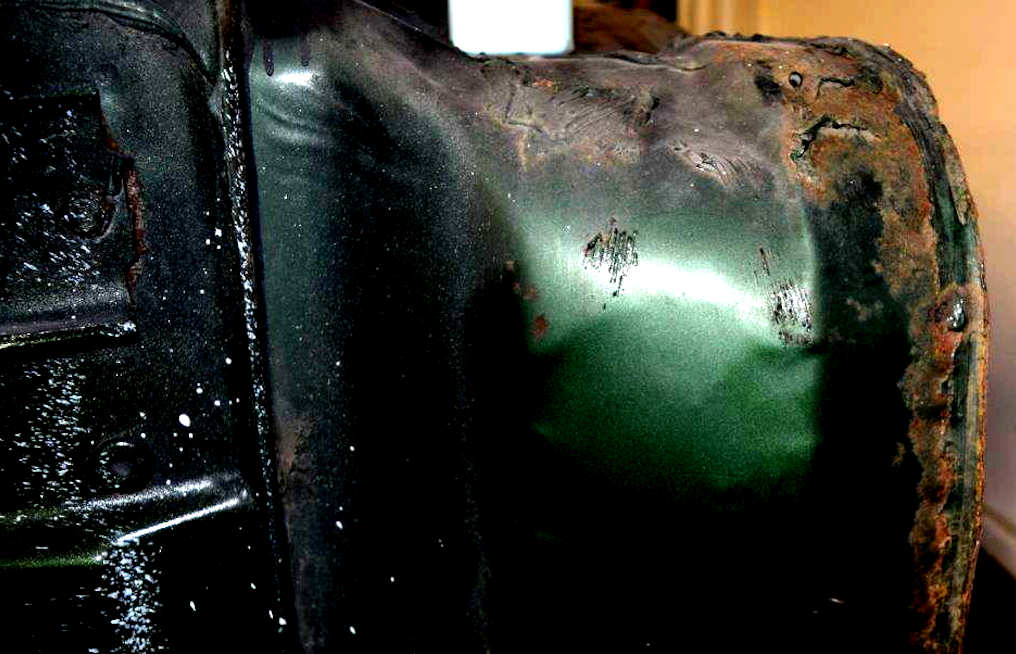
Many times the side of a cowl panel can offer up good original paint
samples. If you take some wax and grease remover and rub the side
panel and buff it with a heavy cutting compound you will normally be
able to get it clean enough to see the correct tone of the original
color as well as have a large enough area to apply your color match
camera if you have one available
Document what color the original primer was as this too varied from plant to plant and from year to year. Make note of any black out paint that covered the primer on the floor and firewall if the plant your car was built at did that. Look for any paint drips on the belly pan and firewall. Investigate to see if your firewall was painted prior to body color or after.
How far did the body color overspray cover the primer or blacked out areas? Is the paint coverage in the door, hood and deck lid jamb areas thinner than the main body? How was any sound deadener applied and to what areas? Look for any areas of the body that may still retain original factory applied paint. Areas such as under the deck lid surface, on the cowl ends, under the door or deck lid weather-stripping or under the upper roof rail weather-stripping are good places as many times these areas were unmolested during a repaint.
This will give you a very close example of what color paint was originally applied to the car. Using paint chips you should then be able to get very close to the original color. In the case of special order painted cars (- - on the trim tag), finding these original painted areas will not only give you a color example but may be used as proof it its origins. Photographing all of these areas will help immensely in the paint restoration and documentation process. If you chose to restore your car exactly how it was built all of this will give you photographic proof of where and how things were done.
Paint Removal
There are several ways to remove the old paint finish from the outer body and sheet metal. Depending on how many times the panels have been painted, how thick the paint products are or even what type of paint products were used may help you decide what will work best. Your budget may also weigh in on how you proceed with stripping the paint off. Whether or not you are able to do it yourself or if you would need to pay a professional to do it for you will be your next question. If you are doing your own work make sure to wear all the proper protection items such as face shield, goggles or safety glasses, face mask or breathing apparatus and gloves.
Machine Sanding
Sanding the old paint and body filler from outer surfaces of the body and sheet metal is a big job and very time consuming. Most sanders are dual action and can be used as an orbital sander or can be used in a grinding mode. Using the DA in a grinding mode will cut faster but will create more heat. If you are not very careful you could possibly warp or distort the panel.
Using the DA as an orbital sander will work but can also be time consuming as it does not remove material as fast as it does in the grind mode. Keep the sander flat on the surface and be careful not to tilt it at an angle. Tilting the sander will not only wear out the outside edge of the paper but will also create heat and may causing the panel to distort or warp.
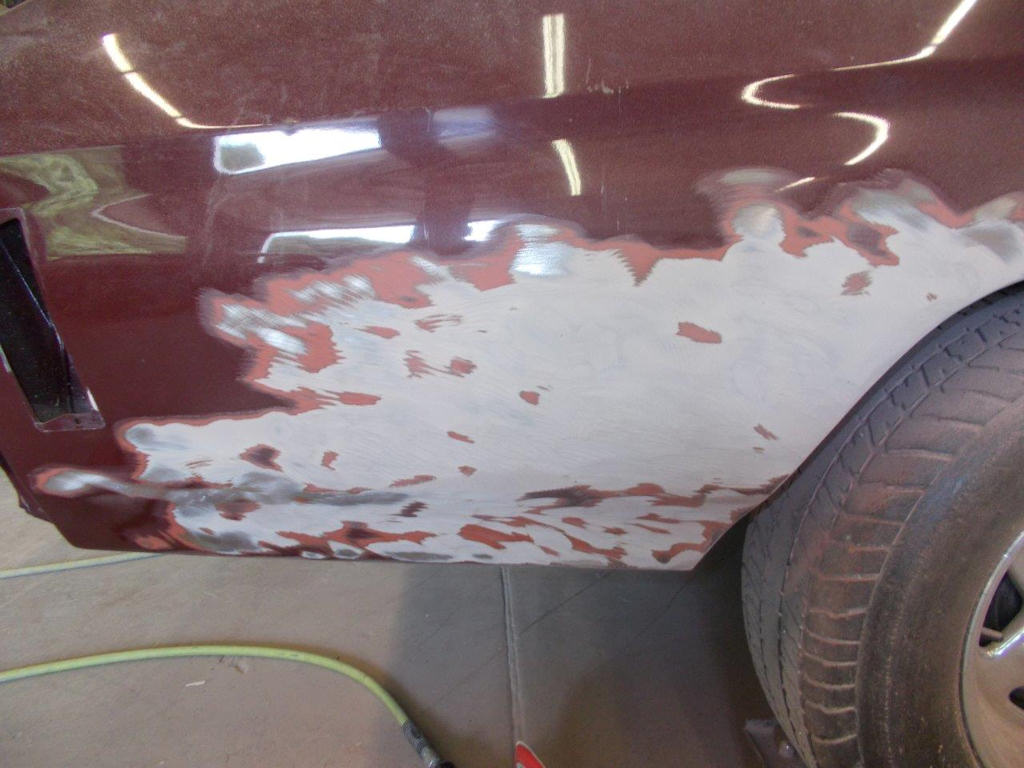
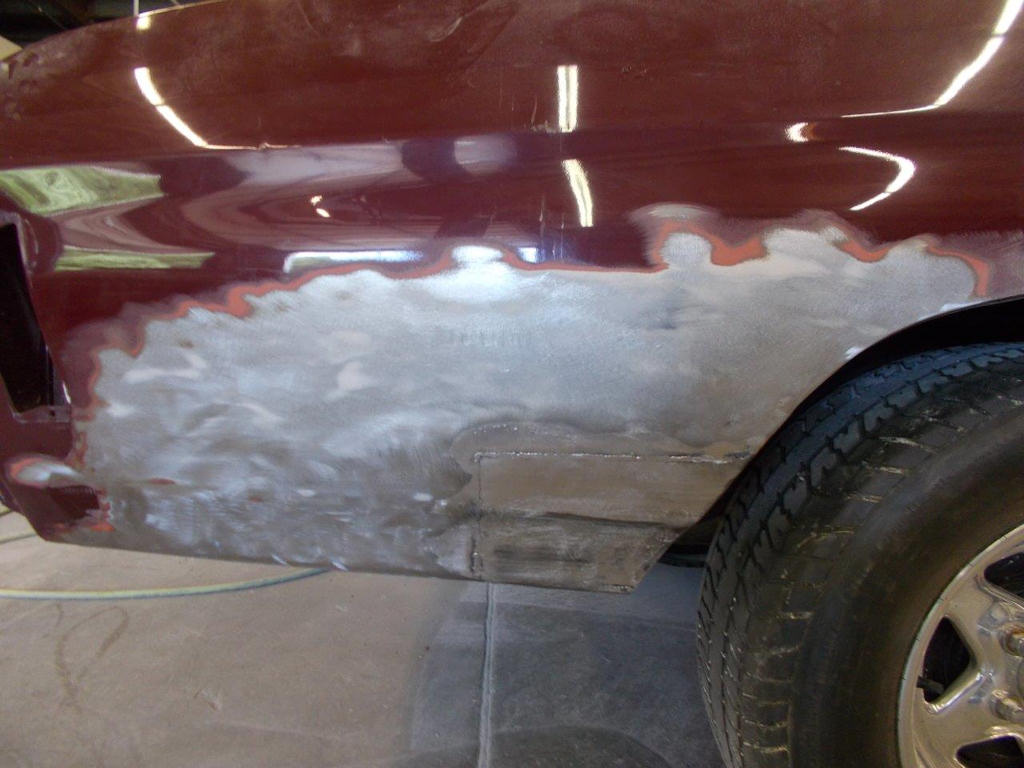
Sometimes at first glance the body panels may look pretty good
but be careful not to underestimate what type of work has been done
at some point. Even though are going to restore, you may run into replacing
panels that you did not expect and could drive the cost of the
restoration up significantly.
The safest way to machine sand is to use 80 grit DA paper. Keeping the sander flat on the panel and using light downward pressure, run the sander slowly back on forth over the painted surface removing one layer of paint at a time. This will cut the fastest, get you the longest life out of your sand paper and create less heat. Be careful to not to apply too much downward pressure to the sander. This could also generate heat and could warp the outer panel. Using light pressure will not only cut better it will prolong the life of the sand paper. Forty grit DA sand paper can also be used but remember the more aggressive papers will cut faster creating more heat.
Chemical Stripping
There are a couple methods that can be used to chemically strip the paint products from your project. You can use chemical strippers that can be applied with a paint brush or you may opt to bring your car to a business that specializes in chemical stripping. These types of business will take all your sheet metal and body core and lower it into a large tank to chemically remove the paint. This process will not remove rust, seam sealers or bondo so keep that in mind when pricing it out. This is usually not terribly expensive and takes only a short time but clean up here is the key to success as improper cleaning and prep can lead to major paint issues later on.

Brush-On Stripper
Using brush on stripper is messy and a slow process but is an effective way to remove the old paint. Because of the harmful vapors this will need to be done in a well ventilated area and away from any flame source. There are many different products on the market and before starting make sure you read the directions and the safety instructions on the label of the product you choose. It would also be a good idea to read up on the Material Safety Data Sheet that is supplied by request so you know what you are working with and how to treat yourself in case of an accident. Be sure to protect your eyes and hands with solvent resistant gloves and goggles. Pour the paint remover into a metal container and brush on a thick coat with a chemical resistant brush. Start by working a nine square foot area brushing the stripper in one direction. Generally it will take ten to fifteen minutes for the paint to soften or blister. The paint can then be removed with a flexible plastic scrapper. Be sure to dispose of chemical as instructed on the label.
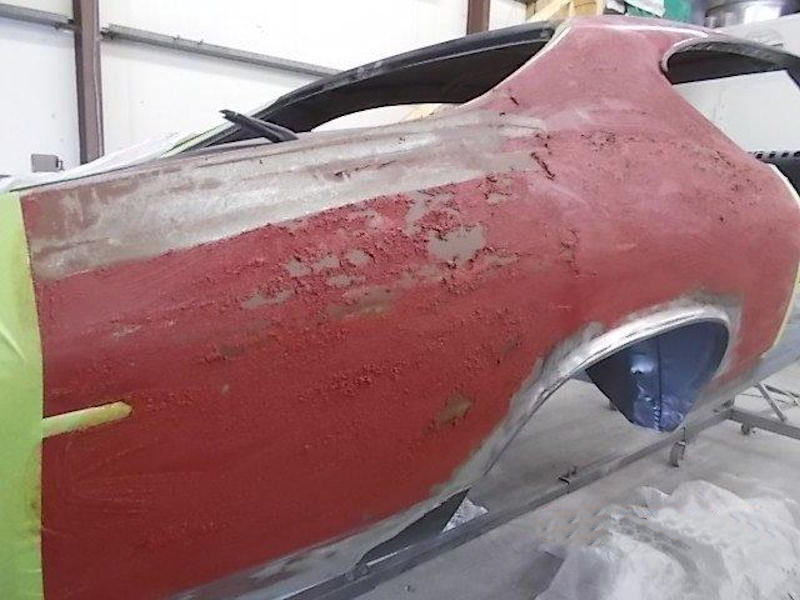
Chemical stripping is an effective but messy way to remove the
paint and primer from the exterior panels especially when you are
stripping of older lacquers and enamels. Some of the newer urethane
products may need to be coated a couple times it get all of the
paint products removed.
Acid Dipping
Sending your project to a facility that can acid dip is a great way to get the entire body and sheet metal stripped to the bare metal. Most have large dip tanks of safe chemicals that they can submerge an entire body into and remove the paint, rust, primer, sealers and body.
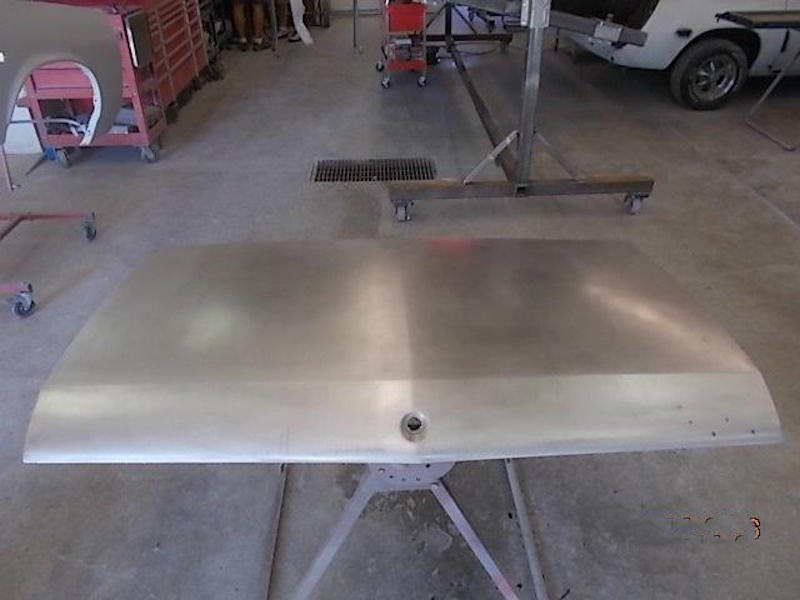
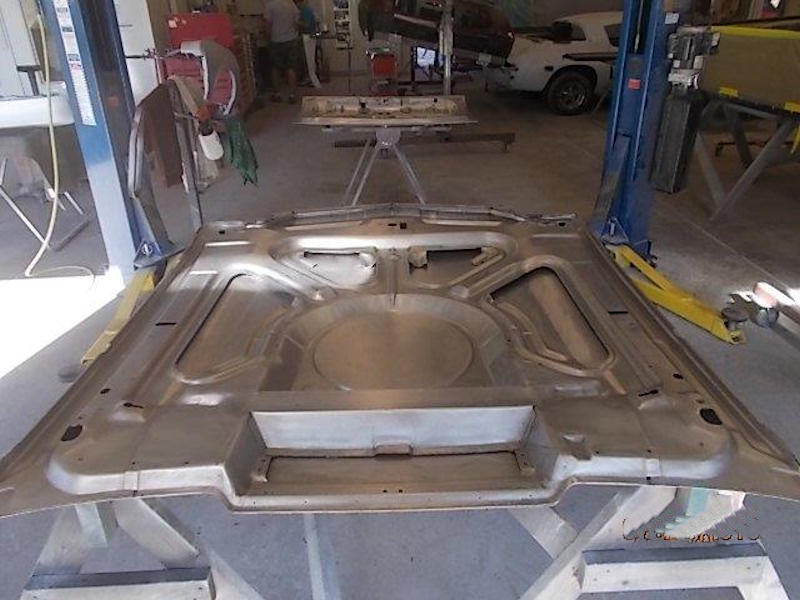
When you get your panels back from being acid tanked all of the
undercoating, seam sealer and paint materials would have been
stripped off and you will be left with a bare steel panel. Also all
of the structural adhesives that are between the inner and out panel
will have been softened up and removed. Be sure to reapply those
adhesives where needed.
These chemicals will strip the paint and remove the rust from the entire project. One such business is Maintenance Equipment Chemicals in Nanty Glo, Pennsylvania. MEC uses a water base rust inhibitor to keep the steel parts from re-rusting for up to 60 days when stored under roof. For more information on acid dipping visit their web site at mecchemicals.com.



