

Timing Gear Replacement
Ref: Chilton's Auto Repair Manual 1964-1971
Inline 6-cylinder Engine
Inline Engine Camshaft Removal and Replacement
1 - In addition to removing the timing gear cover, remove the grille assembly.
2 - Remove valve cover and gasket, loosen all valve rocker arm nuts and pivot the arms clear of the pushrods.
3 - Remove the distributor.
4 - Remove coil, side cover and gasket. Remove push rods and valve lifters. (If reusing the camshaft, mark the push rods and lifters for their relative position on the camshaft.)
5 - Remove the two camshaft thrust plate retaining screws by working through holes in the camshaft gear.
6 - Remove camshaft and gear assembly by pulling it out through the front of the block.
The timing gears on an inline (6 cylinder) engine must be pressed on the
camshaft so the camshaft must be removed from the engine. Likewise
the crankshaft gear is pressed on the crankshaft but can be
removed/installed without removing the crankshaft with the proper
gear puller and installation tool.
The camshaft gear must be pressed off the camshaft and the replacement camshaft gear must be pressed on. In placing the gear on the camshaft, press the gear onto the shaft until it bottoms against the gear spacer ring. The end clearance of the thrust plate should be .001 to .005 in. If replacing the crankshaft gear (advised to replace in pairs) now would be the time to remove and replace the crankshaft gear with the proper puller/installer tools.
7 - Install camshaft assembly in the engine.
8 - Turn the camshaft to align and bring the timing marks
together.
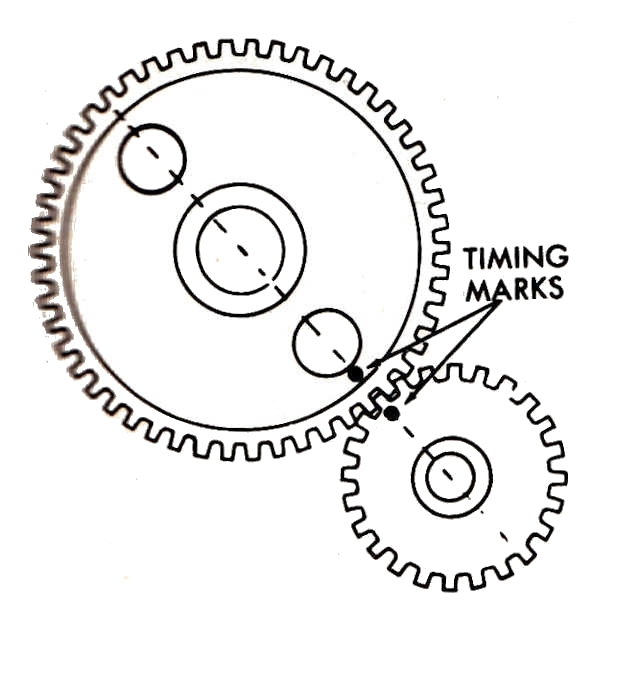
Push the camshaft into this aligned position. Install camshaft
thrust plate-to-block screws and torque them to 6-7-1/2 ft. lbs.
9 - Run out on either crankshaft or camshaft gear should not exceed .003 in.
10 - Backlash between the two gears should be between .004 and .006 in.
11 - Install timing gear cover and gasket.
12 - Install oil pan and gaskets.
13 - Line up keyway in balancer with key on crankshaft and drive balancer onto the crankshaft until it bottoms against the crankshaft gear.
14 - Reinstall valve lifters and pushrods. Install side cover with new gasket. Reinstall distributor and coil and attach all wires. Set proper valve lash as described on Valve Adjustment - Hydraulic page.
15 - Reinstall remaining engine components, belts, radiator, rocker arm cover, and grille.